PowerWand Instructions by Chrystalk
---Original message---
From: "Chrystal Kay"
>Don's Power Wand
>
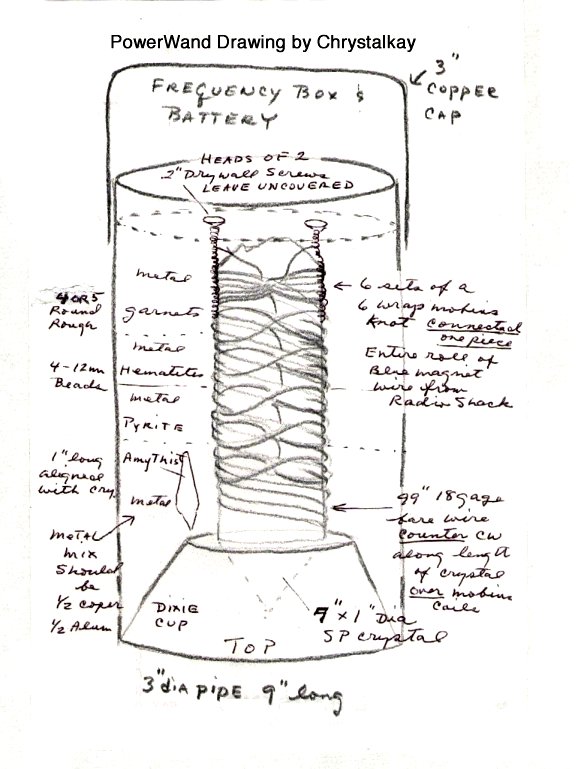
Parts List:
1- 3" copper pipe, 9" long
1- copper cap for pipe
1- dixie cup that will fit snugly in end
1- 7" by 1" dia SP crystal
1- roll blue magnet wire from Radio Shack
2- 2" drywall screws
Shrink wrap tubing- op.
99" 18 gage bare wire
tape
Goop glue
Metal filling- 1/2 copper at least, and aluminum
Resin and catalyst
1- 1" Amethyst point
1/4tsp. Pyrite grains
4- 12mm Hematite beads
4 or 5- rough round Garnets
Frequency box w/alligator clip connectors.
Silicon spray ( or WD-40 )
Instructions:
Preparing large crystal:
Start at the bottom of the crystal. ( make the 'ears' that will
stick out
rather long- 2-3") Using magnet wire, make a six wrap mobius
knot , and
continue below that and make a second six wrap mobius knot.
Continue to make
a total of six- six wrap mobius knots from the same continuous
piece of
wire. ( look in Don's files to see how to twist the wire for the
knot.)
Now attach 2- screws to 'ears' by firmly wrapping around threads
and either
shrink wrap or goop glue well. ( no bare wire or screw length
exposed) Leave
only the head exposed. Tape to crystal to hold in place while
pouring, head
ends up beyond end of crystal.
With the entire length of bare wire, wrap the crystal from top to
bottom
counter clockwise. (there is a reason for that)
On to the assembly:
This project is made beginning with the TOP.
Fit your Dixie cup into the top end of the pipe, (flat side in)
and trim
flush with rim. Cut x in bottom and insert point of large crystal,
from the
bottom of the cup, up.( Don does this so point will be below the
rim of the
pipe.) Glue well
around crystal and glue cup in place flush with rim.
Now turn over, bottom side up.
Put just enough metal and resin in to cover cup and meeting place
of crystal
and cup bottom. Let
harden. (Less leaks this way!)
Add metal to position amethyst in. Place amethyst point down next to
crystal pointing same way, and add catalyzed resin.( Let firm up
between
each layer.)
Sprinkle pyrite in, add metal and pour on resin.
Add Hematite, add metal and pour on resin.
You should be pretty close to the top by now...say 2 1/2" or
so.
Add Garnets, add metal to beneath top of screws. Let cure.
Trim off any boo boos or leaks.
Attach frequency box clips to screw ends.
The frequency box will fit handily into the cap. With some spray
around the
edge of the pipe rim, it shouldn't be too hard to remove the cap
for
changing the battery.
How did I do Don?